The Mechanics of the “Danish” Puff
This pastry is a contradiction in textures. It goes by many names—Danish Puff, Kringle, Almond Puff—but the structure is always the same, and it is entirely distinct from a traditional yeast-raised Danish dough. It relies on a heavy, crisp bottom crust that acts as a foundation, supporting a lighter, egg-rich top layer that billows up in the oven.
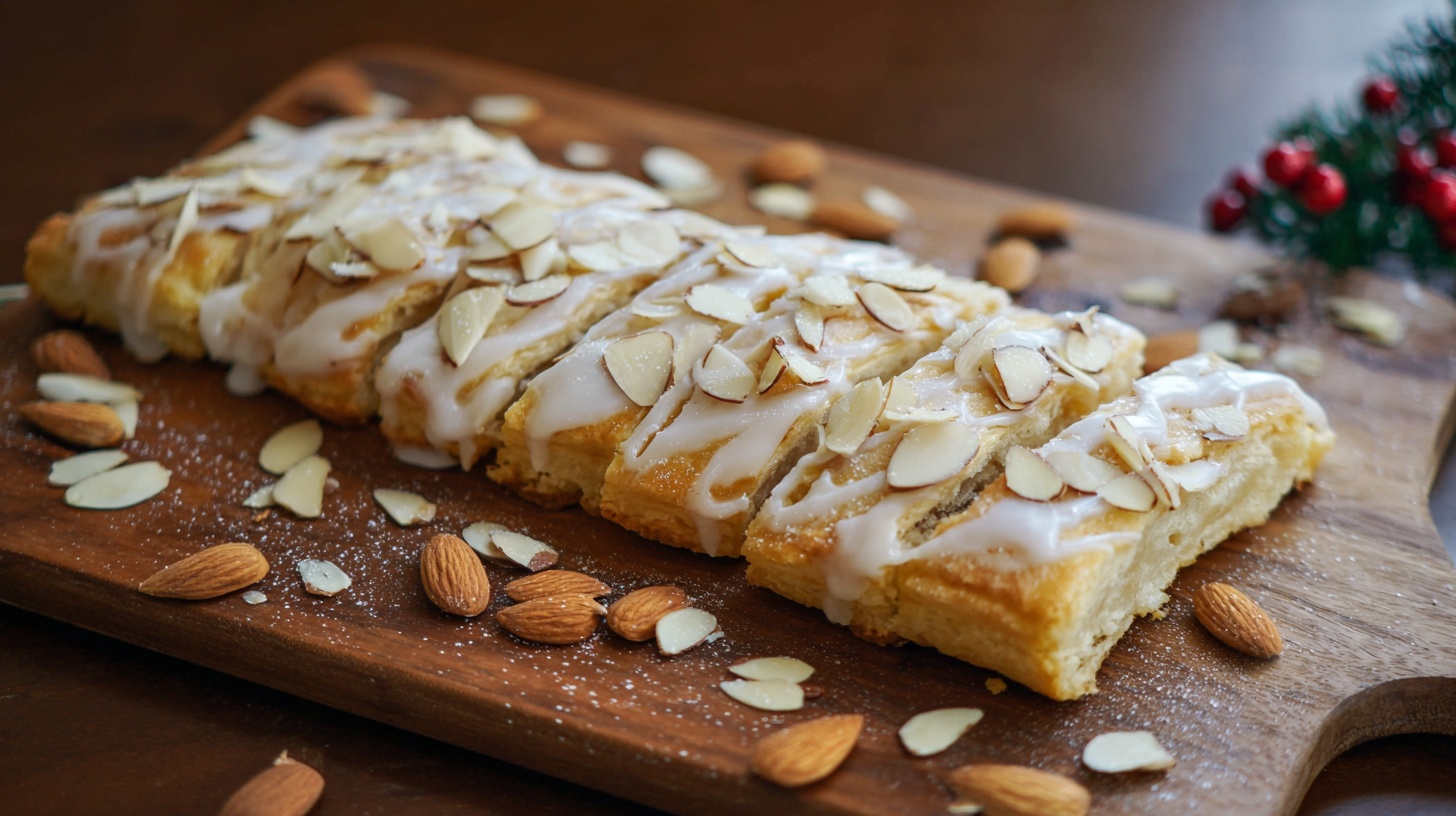
When you bite into it, your teeth hit three distinct zones. First, the glaze and toasted nuts. Second, the “puff” layer, which should be airy but slightly custardy in the center, almost like a localized éclair. Finally, the dense, buttery slab at the bottom that crumbles like a shortbread cookie. It is a messy pastry to eat, flaking apart the moment you touch it, but that structural instability is exactly what you are aiming for.
Understanding the “Two-Dough” System
Before you start measuring anything, it is helpful to understand that you are essentially making two completely different doughs and bonding them together before baking.
The first dough is a standard pie-crust or shortcrust style mixture. You cut cold fat into flour and bind it with a tiny amount of water. This layer provides stability. If you didn’t have this base, the top layer would stick to the pan and burn.
The second dough is technically pâte à choux—the same dough used for cream puffs and eclairs. It involves boiling water and butter, stirring in flour to gelatinize the starches, and then beating in eggs to create a paste that traps steam. This layer is where the “puff” comes from. The steam generated by the water content forces the dough upward, while the proteins in the egg set the structure so it doesn’t collapse.
Ingredients to Gather
You need to be precise here, particularly with the eggs and temperature.
For the Base (The Crust):
- All-Purpose Flour: 1 cup.
- Unsalted Butter: 1/2 cup (1 stick), cold and cut into cubes.
- Water: 2 tablespoons. Cold tap water is fine.
For the Puff (The Top):
- Unsalted Butter: 1/2 cup (1 stick).
- Water: 1 cup.
- All-Purpose Flour: 1 cup.
- Eggs: 3 large. Room temperature eggs incorporate faster, but cold eggs work if you have strong arms or a mixer.
- Almond Extract (Alcohol-Free): 1 teaspoon. This is the primary flavor driver. Ensure you use an oil-based or alcohol-free version to avoid harshness.
For the Glaze and Topping:
- Powdered Sugar: 1.5 cups.
- Unsalted Butter: 1 tablespoon, softened.
- Milk: 1-2 tablespoons, adjusted for consistency.
- Vanilla Extract (Alcohol-Free): 1/2 teaspoon.
- Sliced Almonds: 1/3 cup (generous handful).
Preparation Guide
This process moves relatively quickly once you start the stove, so having your ingredients measured out beforehand is necessary.
Step 1: Constructing the Base Preheat your oven to 350°F (175°C).
In a medium bowl, add the 1 cup of flour for the base. Drop in the cubes of cold butter. Using a pastry blender or two knives, cut the butter into the flour until the mixture looks like coarse crumbs. You don’t need it to be uniform; small chunks of butter are fine.
Sprinkle the 2 tablespoons of water over the mixture and toss it with a fork. It will look dry and shaggy. Do not add more water. Use your hands to gather it and press it firmly into a ball. The heat of your hands will melt the butter slightly, helping it bind.
Divide the dough in half. On an ungreased baking sheet, press each half into a strip roughly 12 inches long and 3 inches wide. You should end up with two long, flat rectangles spaced about 4 inches apart. They don’t spread much, but you need room for the puff layer to expand.
Step 2: Cooking the Paste In a medium saucepan, combine the 1 cup of water and the 1/2 cup of butter for the top layer. Turn the heat to high and bring it to a rolling boil. You want the fat completely melted and the water bubbling vigorously.
Remove the pan from the heat immediately. Dump in the 1 cup of flour all at once. Stir wildly with a wooden spoon. The mixture will look like a mess at first, but it will quickly come together into a smooth ball that pulls away from the sides of the pan. This step scalds the flour, which is essential for the texture.
Step 3: Incorporating the Eggs Let the dough ball sit in the pan for about 2 minutes to cool slightly. If you add the eggs while it is boiling hot, they will scramble, and you will have bits of cooked egg in your pastry.
Add the eggs one at a time. Beat the first egg into the dough until it is completely absorbed. The dough will look slick and separated at first—just keep stirring. It will come back together. Repeat with the second and third eggs. Finally, stir in the almond extract. The final mixture should be smooth, shiny, and thick enough to hold its shape, similar to a stiff mortar.
Step 4: Assembly and Baking Divide the egg dough in half. Spread one half over each of the base strips you prepared earlier. You want to cover the base completely, spreading the puff mixture almost to the edges. It’s okay if it looks a bit rough or uneven; the oven will smooth it out.
Bake for 55 to 60 minutes.
Do not open the oven door for the first 45 minutes. The puff relies on steam pressure to rise. If you open the door and let the heat escape too early, the steam will condense, and the puff will deflate into a dense, rubbery pancake.
You will know it is done when the pastry is a deep golden brown and feels firm to the touch. If it looks pale yellow, it isn’t ready.
Step 5: Finishing Remove the baking sheet from the oven and let the pastries cool completely. They will settle slightly as they cool; this is normal.
While they cool, whisk together the powdered sugar, softened butter, vanilla, and milk. You want a glaze that is thick but pourable—like honey. If it’s too thick, add more milk a teaspoon at a time.
Spread the glaze generously over the cooled pastries and immediately sprinkle with the sliced almonds so they stick. Slice into strips diagonally for serving.
Texture Notes and Doneness
One of the most confusing things about this recipe is the interior texture. When you slice into a properly cooked Danish Almond Puff, the center of the top layer might look slightly damp or webby.
This does not necessarily mean it is undercooked. The egg-rich dough creates a custard-like structure inside the air pockets. However, there is a fine line between “custardy” and “raw dough.”
If the center is gummy or tastes like raw flour, it needed five more minutes in the oven. The exterior should be crisp, almost like a cracker. If the exterior is soft straight out of the oven, the moisture trapped inside will eventually make the whole pastry soggy. You are better off overbaking this slightly than underbaking it. A dark brown crust tastes like toasted butter; a pale crust just tastes like starch.

Troubleshooting: The Collapse
The most frustrating failure mode for this pastry is the collapse. You pull it out of the oven looking magnificent—puffed high and golden. Five minutes later, it has sunk flat.
This usually happens for one of two reasons:
- Underbaking: The internal structure of the egg proteins hadn’t set hard enough to support the weight of the dough once the steam pressure dissipated. Next time, leave it in longer.
- Moisture retention: Sometimes, if the kitchen is very humid or the dough was too wet, the pastry retains too much steam. Some bakers pierce the pastry with a sharp knife the moment it comes out of the oven to let the hot steam escape, preserving the crisp shell.
Flavor Variations
While almond is the classic profile for this “Scandinavian” style treat, the dough itself is neutral. The base is just flour and butter, and the top is just eggs and flour. This makes it a blank canvas if you want to move away from the almond extract.
- Lemon: Skip the almond extract. Add the zest of one lemon to the egg mixture. Use lemon juice instead of milk in the glaze. This cuts the richness of the butter effectively.
- Vanilla Bean: If you dislike the strong, sometimes medicinal taste of almond extract, simply double the vanilla in the glaze and scrape a vanilla bean into the egg dough. It results in a milder, “cream puff” flavor profile.
Storage and Leftovers
This pastry is roughly 50% butter, which impacts how it stores.
At room temperature, you can keep it in a container for about 2 days. However, you will lose the textural contrast. The moisture from the puff layer will migrate into the crisp base layer, softening it. It will still taste good, but it will be a soft pastry rather than a crisp one.
Do not refrigerate it. The refrigerator environment is dry but cold, which accelerates the staling process of the flour and turns the butter waxy.
Freezing is actually a better option if you can’t eat it all within 48 hours. Freeze the baked logs without icing. Wrap them tightly in foil. When you want to serve them, put the frozen logs into a 350°F oven for 10 minutes to crisp up the crust, let them cool, and then apply the icing. This restores the crunch that storage usually destroys.